You’ve made it this far. I’ve made it this far. We’ve made it this far together.
Welcome to the final installment of Building a Free Website. We have a database, we have a server, and we’ve connected them all up. Now the time has come to install WordPress and launch our free site for the world to see. We’ll also take care of some security things and set up our very own CDN.

As the series has progressed, we’ve gotten a bit more technical and I’ve tried to hold your hand a bit less. We’ll be kicking that up a notch here as well.
Part 1 | Part 2 | Part 3 | Part 4 | Epilogue
Now, without further ado, let’s get to it.
Installing WordPress
WordPress.org (not to be confused with WordPress.com, which is a whole other thingThough both run by Automattic) is the home of the WordPress open-source content management system. We’ll want to grab the installer from their site and put it into our web server. Once we have it up and running, we’re going to configure NGINX to route HTTP requests to WordPress, which will do some magic under the hood and return a fully formed webpage, complete with dynamic theme to the visitor.
If we were downloading it onto our computer, we’d need to visit the website, download the installer, and run it. However, we have a Linux server, and package managers to make the whole thing easier for us.
SSH into your EC2 instance and cd to your website folder at /var/www/mywebsite.com. Once there, we’ll need to download and install WordPress, and we can do so through the magic of wget (use sudo if you aren’t the root user):
$ wget https://wordpress.org/latest.tar.gz
$ tar -xzvf latest.tar.gz
wget goes to the WordPress site and downloads the latest stable build of WordPress for us. We use tar to unzip the compressed archive file… and that’s it. WordPress is installed!

- If your EC2 instance doesn't have
wget, you can install it with the following command:apt install wget. - You need to be a user with root access to download and install WordPress (and
wget). Either prependsudoto the previous commands orsudo su rootbefore starting.
WordPress will have self-created a directory, which will be the home of our website. However, we need to move it up to the root of our website directory, as per the installation directions, otherwise it won’t work. We want to copy all of the contents of the wordpress directory into /var/www/mydomain.com. We can get rid of the downloads afterwards.
$ cp -a wordpress/. .$ rm -R wordpress$ rm latest.tar.gzWordPress has been installed… but we need to configure it to work with our AWS setup. Specifically, we need to tell it how to talk to our RDS instance. We do that by creating and editing the wp-config file, which provides all the various parameters and configuration options WordPress needs to keep track of. Our install comes with a sample config file, so copy it into a new active file:
$ cp wp-config-sample.php wp-config.phpOpen our new wp-config.php with nano or vi and scroll down to the MySQL settings section. You’ll see four define() blocks, each with two parameters. We need to update the second parameter of each block with our database information from Part 4:
/** The name of the database for WordPress */
define( 'DB_NAME', 'wpdatabase' );

/** MySQL database username */
define( 'DB_USER', 'dbadmin' );

/** MySQL database password */
define( 'DB_PASSWORD', 'your_password' );

/** MySQL hostname */
define( 'DB_HOST', 'wpdatabase.cabthgz5oiyo.us-east-1.rds.amazonaws.com' );
DB_NAMEis the name of your database, not your database instance. When I set them up I used the same name for both, but if you used different ones make sure to use the correct name.DB_HOSTis the full URL of your database instance.
Next, we need to secure our connections by filling out the Authentication Unique Keys and Salts section. WordPress uses these for pretty much anything privileged involved in running the website (i.e., all site administration). To do so, simply copy salts from WordPress’ salt generator and paste them in place of the existing ones already in the file (if you’re using nano: Ctrl + Shift + K to delete the placeholder lines; Right Click to paste the new ones).
// Not real keys. Obviously

define('AUTH_KEY',         '5KQCDaR3`Z`fn*N#,>c>orRvr2T.=R6%=Vuo=6+.2T,1f9rW+O(RekX3+gx:31t>');
define('SECURE_AUTH_KEY',  '#7<86DjJ$aQr,-8[L+Ty%iwL~Xc/>po]R,S3ef/2Z;OnGSnu:Mm1lHPe*[o|UP.+');
define('LOGGED_IN_KEY',    'FE&-XI=v1l<)v*K!(=6azJBDHT^o^d<NjLys-D=4&+ [ .^=ebN/md-[4>HCt.wU');
Save the file and restart NGINX. If everything is configured properly, you should now be able to go to your domain and you’ll be greeted by the WordPress launcher page. Follow the steps and you’ll have a WordPress site ready for configuration and launch!

From here, you can get started building your website. You can draft pages, download and install themes, write blog posts—the world is your oyster. However, stay with us—we’re not quite done dotting our I’s and crossing our T’s just yet.
HTTPS Always: SSL Certificates
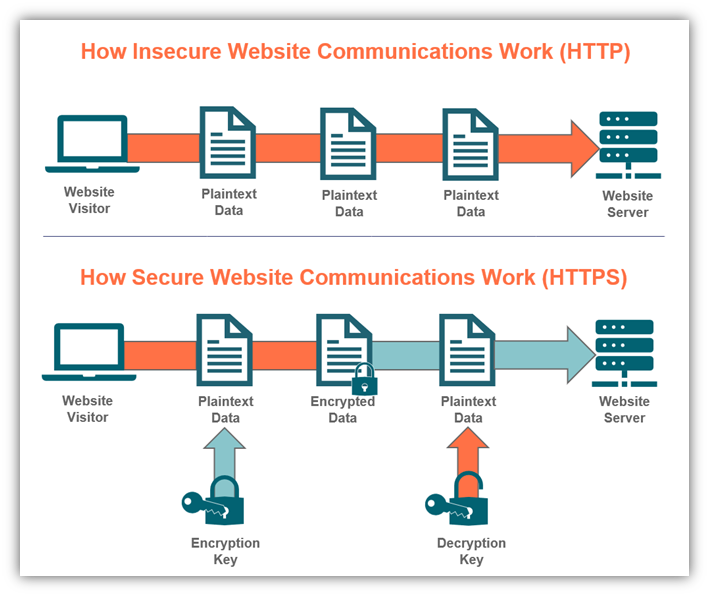
When doing anything on the internet, privacy and security should always be in the back of your mind. Our site management and servers are pretty well protected by our use of SSH and complex passwords (built on one of the most robust and secure cloud platforms out there), so we don’t need to worry about unauthorized users breaking in and defacing our website or stealing our AWS credentials. However, our website is public in the most literal way possible: whenever someone visits our site and asks for a page (a GET request), we send the relevant HTML completely unencrypted.
This is not the end of the world—after all, our website is public, so if someone was spying on our user, they could figure out what the user was looking at by simply visiting the same page as they did. What is more problematic is the fact that sometimes users want to input information into a website. Information like passwords. Like, say, on an admin login screen…
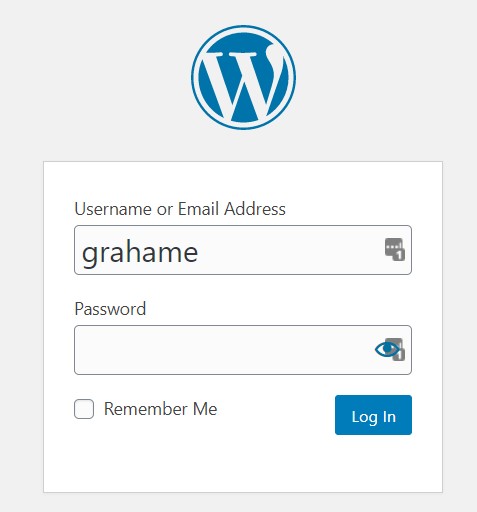
Yep. You sent your password unencrypted to your webserver when you logged into the admin portal at your mydomain.com/login page. The good news is you did not get your password stolen. But this is a gap, and we need to plug it.
Enter the Secure Socket Layer (SSL). Similar to the public key/private key method of authentication in use when we access our EC2 instance via PuTTY, setting up our website with a SSL certificate will allow our website and any visitors to conduct their browsing session via an encrypted channel (HTTPS), instead of sending things in plain text over the internet (HTTP).
SSL certificates are issued by a number of registrars, who are responsible for confirming the domain belongs to the requester and maintaining those lists and records. In the old days, companies would charge for this service (and most still do, especially for more advanced SSL certifications). But in this modern day and age, we have Let’s Encrypt.
Installing an SSL Certificate
Let’s Encrypt provides a free automated SSL management tool called Certbot which does everything we want (and then some). Certbot will install our certificate, update our nginx.conf file to redirect all HTTP requests to HTTPS, and set a timer to re-run the protocol every 90 days to keep the certificates fresh and active.
To get started, grab the Certbot repository and add it to your EC2 instance. Accept any TOS or other conditions, and install using apt:
$ sudo add-apt-repository ppa:certbot/certbot
$ sudo apt install python-certbot-nginx
Certbot is now ready to go. Provided you’ve been following along, it should automatically be able to find your website, located at /etc/nginx/sites-available/mydomain.com, and use the info in the conf file to issue the certificates. If you did anything weird/different, go to your site’s conf file and check that you have both a www and root entry in the server_name line.
// Your conf file should have this line somewhere
// If it doesn't, add it/fix it, save, and restart nginx

// ...
server_name mydomain.com www.mydomain.com
Certbot will also need port 443 open on our firewall. Port 443 is the default HTTPS port, and should already be open (as of this writing, the EC2 image used by AWS came with 443 already configured). You can check with the command sudo ufw status. In the To column, you should have entries for Nginx Full & Nginx Full (v6). If you only have entries for Nginx HTTP, you need to delete and replace them:
$ sudo ufw allow 'Nginx Full'
$ sudo ufw delete allow 'Nginx HTTP'
We are now finally ready to let Certbot work its magic. Run the NGINX plugin for your domains to get a certificate:
$ sudo certbot --nginx -d mydomain.com -d www.mydomain.comCertbot will prompt you for some things (email address, TOS confirmation), and then will ask you if you want to redirect HTTP traffic to HTTPS.
The answer is yes. Yes, you want to redirect traffic. Otherwise why did you bother reading this section?
Certbot will run, and will probably reload NGINX. Then it will be done, and will give you the output info, along with some links to donate to Let’s Encrypt and the EFF. Certbot will have also automatically set up the 90-day renewal process by creating a cron job in our server, which will run the script we just ran every 90 days. You can test the script by doing a dry run:
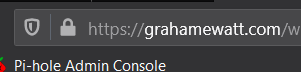
$ sudo certbot renew --dry-runAnd that’s it! Reload your site and you should see the little padlock in the browser bar that indicates success. You can also run security tests (Google SSL Server Test for a whole host of test) to see how your site stacks up.
CloudFront CDN
By any measure, setting up a content delivery network (CDN) is completely optional. If you don’t intend on using your site for much more than a contact form and an “About” page, I wouldn’t blame you for skipping this section. But if you intend to do things that will build a media library over time (e.g., write a blog w/ lots of images, distribute your e-book), then I highly recommend setting up a CDN. And, thanks to the magic of free tier, we can do it right here on AWS for FREE!
Amusingly, this is actually the most involved process in this article. None of the steps are particularly hard, but there are several of them. We need to:
- Set up an S3 bucket to store our media
- Set up a CloudFront Distribution
- Create a subdomain for our CDN
- Install and configure Offload Media Lite, syncing our website with our CDN
The AWS Part
The first three steps will take place in AWS, so go ahead and log into the console. Navigate to the S3 service and press the orange Create Bucket button. We have a few options covering name and access. Since the items in this bucket are for public consumption, we want to turn off the Block all public access setting.
As for name? It’s going to be the same as our subdomain. This is not optional—it’s a quirk of how Cloudfront works and if the bucket is not properly named, we cannot issue it an SSL certificate nor can we properly point Cloudfront to serve files from the bucket. I recommend something simple (e.g., cdn.mydomain.com). You can ignore advanced settings, and press Create Bucket to finish up. The bucket should appear in your bucket list as “Public,” meaning that items within the bucket can be viewed anywhere on the web—though the bucket console itself cannot. You can test by uploading an item to the bucket via the console, selecting it, and pasting the Object URL into an incognito browser window. You should be able to see the file you uploaded without needing to log in.
Next, head over to Cloudfront and press the Create Distribution button in the main dashboard. Choose a Web delivery method to find yourself presented with a whole bunch of settings to address. Thankfully, the defaults will mostly work for us.
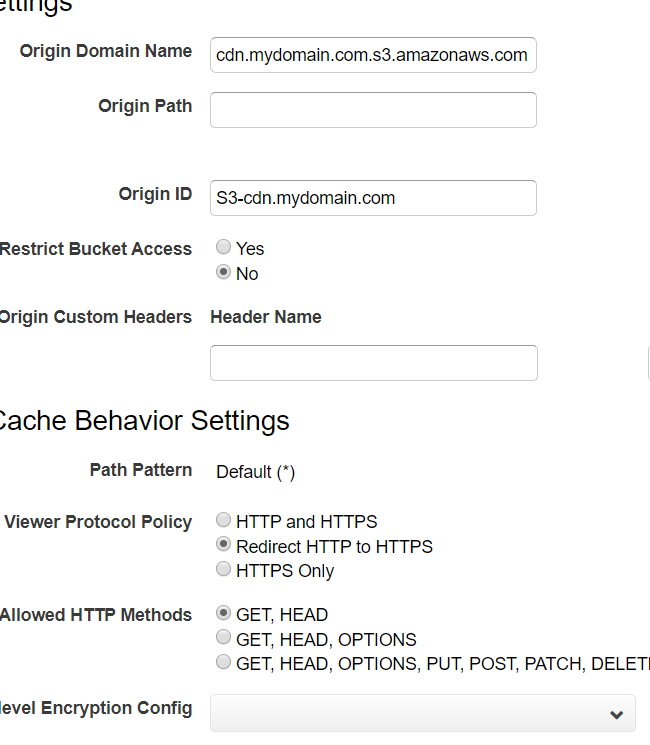
Put your S3 bucket in Origin Domain Name and fill out an Origin ID that will help you keep track of it. Next, scroll down to Viewer Protocol Policy and change it to “Redirect HTTP to HTTPS.” Finally, scroll down to the Distribution Settings menu and add our subdomain to Alternate Domain Names.
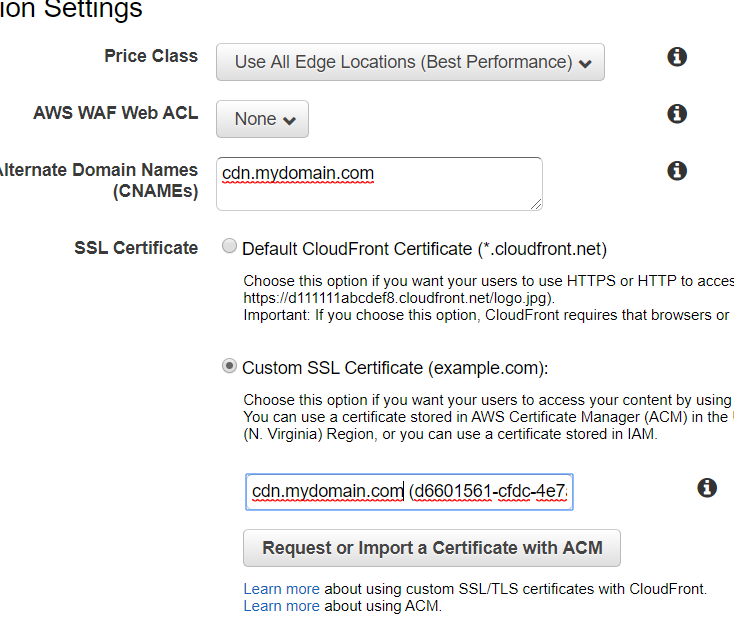
Our distribution will not launch without an SSL certificate to secure it. AWS will happily do this for us. Click the Request a Certificate with ACM button to launch the AWS Certificate Manager (ACM) in a new tab. The wizard is pretty straightforward; simply add our new cdn.mydomain.com domain, and click through to “Step 5: Validation” (we can leave the defaults alone). ACM will show our newly certified domain as “Pending.” It will periodically check our DNS until it finds the CNAME record it provided. You can manually copy it over, or you can let AWS do the heavy lifting for you—expand the field and press the Add to Route 53 button to automatically copy the record into the DNS. Doing so will also trigger another test by the ACM, so everything should all sync up in a matter of minutes.
Couldn't we have done this for our other SSL certificates? Sure, but it never hurts to learn two different ways of doing things. In addition, our method of using Certbot within our web server is applicable to cloud hosts and other hosts outside of AWS, and keeps our DNS records a little bit tidier.
Once the SSL certificate moves from “Pending” to “Issued,” go back to our CloudFront tab. Select Custom SSL Certificate and add our new certificate to the field. Check everything over once more, and create the distribution. It’ll take a few minutes to spin up, but we can move on while it does.
With the bucket and distribution set up, we need to make changes to our DNS so that when our images are linked into our site pages from cdn.mydomain.com, the traffic is properly directed to Cloudfront and the image. Grab the Domain Name from our distribution ([ID].cloudfront.net) and create a CNAME record for cdn.mydomain.com with [ID].cloudfront.net as the value.
The WordPress Part
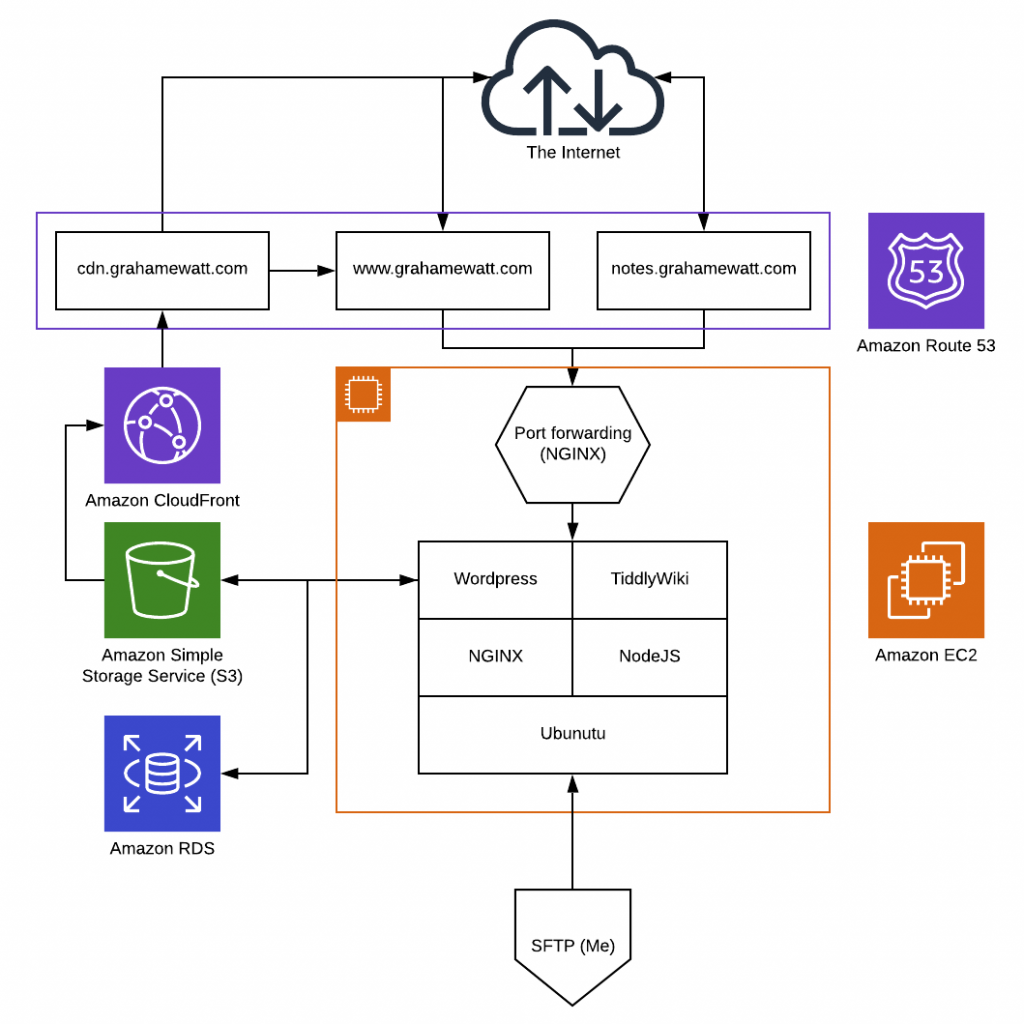
We are in the home stretch. All the infrastructure has been set up. Our website now looks just like our diagram. All we have left to do is connect our website to S3, and for that we’ll use Offload Media Lite.
As with any WordPress plugin, we can download and install them directly to our website from within the WordPress CMS. Log into your website and open the Plugins page from the left menu to see your current plugins. WordPress automatically comes with a few defaults; you can explore, add, or remove them at your leisure.
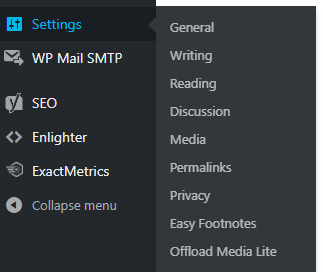
To get the Offload Media Lite plugin, press Add Plugin to visit the plugins catalog, and use the search function to find the plugin. Installation is easy as clicking Install Now—WordPress will automatically download and install the plugin for you. Once it’s done, press Activate and refresh the page. If you check the Settings dropdown in the left menu, Offload Media Lite will have magically appeared, ready for configuration.
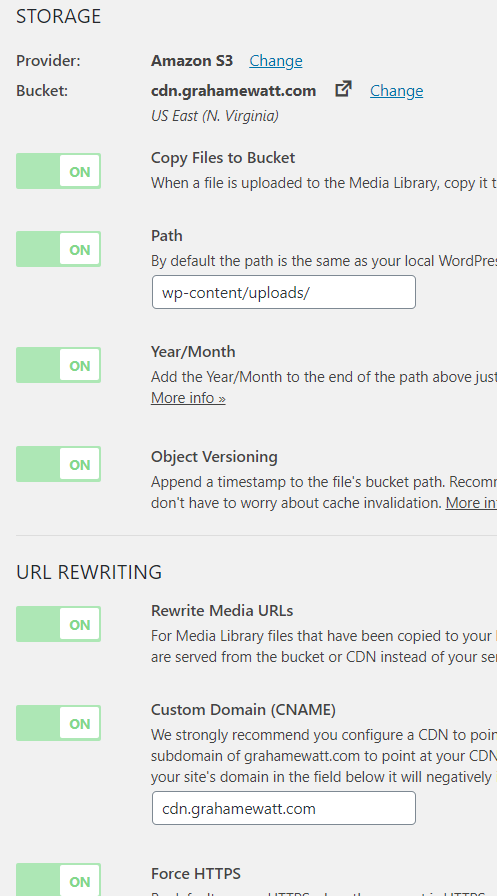
Open ‘er up, and fill out the fields in the Media Library tab as follows:
- Provider: Amazon S3
- Bucket: The name of your S3 bucket (
cdn.mydomain.com) - Path: wp-content/uploads/
- Custom Domain:
cdn.mydomain.com
And turn all the switches to the “On” position. This will tell Offload Media Lite to move all files and images over to s3 whenever you upload them, organize them the same way WordPress would, and then remove them from your EC2 instance, saving space on our little hard drive.
“But wait! When I chose Amazon S3 for my storage provider, it said something about access keys?”
Oh. Yeah, I suppose it would.
After you save your configuration and try and test the plugin, it will fail. You’d think it should just work, since the server is within the VPC, but we need to create a “user” for Offload Media Lite to use to access the s3 bucket. We’re done with configuration here in WordPress, but we need to make one final pit stop in AWS, in the Identity and Access Management (IAM) service.
The Other AWS Part (IAM)
Create a new user (Users –> Create User) and give it Programmatic Access. Call it something you can easily identify (e.g. “offload-lite”), and move to the “Permissions” step.
If you’d like a challenge, this is a good opportunity. We need to give the user the ability to PUT new items in our cdn.mydomain.com bucket, GET items from the bucket, DELETE objects within the bucket, and see a LIST of some or all of the items in our bucket. You can either create another security group, or just attach those rules directly.
If you can’t solve it, or you’d rather just copy-paste the answer, take the following code and paste it into the JSON editor (Attach existing policies directly –> Create policy –> JSON):
{
    "Version": "2012-10-17",
    "Statement": [
        {
            "Effect": "Allow",
            "Action": [
                "s3:CreateBucket",
                "s3:DeleteObject",
                "s3:Put*",
                "s3:Get*",
                "s3:List*"
            ],
            "Resource": [
                "arn:aws:s3:::cdn.mydomain.com",
                "arn:aws:s3:::cdn.mydomain.com/*"
            ]
        }
    ]
}
Click through the rest of the steps, and make sure to save the Access Key and Secret Key assigned to the user. If you lose them, we have to reset them, so keep them in a safe place (with your private ssh keys is a good option).
The keys go in your wp-config file. SSH into your EC2 instance, and navigate to the file. Add the following lines above the /* That's all, stop editing! Happy blogging. */ comment:
define('AS3CF_AWS_ACCESS_KEY_ID', '[ACCESS_KEY_ID]');
define('AS3CF_AWS_SECRET_ACCESS_KEY', '[SECRET_ACCESS_KEY]');
Save and close. To check it’s working, refresh the Offload Media Lite settings menu. All errors should have disappeared. You can test it by uploading a file or image to your website through the Media Library in your WordPress CMS, and then looking for it in your S3 bucket. If there is a file or folders magically there that weren’t before, you’re all set!
Final Thoughts
Congratulations on building your free website! While it’s a little more technically involved than most of the “start-your-own-website” posts out there, this website setup will be free for all of the next twelve months. Hopefully you’ve also learned a fair amount about how websites are put together and what goes on behind the scenes.
As someone who finds joy in building and creating, this was a wonderful project and has continued to pay dividends down the line. I didn’t cover any of the things involved in designing or managing a website, and there are plenty of other things to explore involving setting up email, contact forms, comments, etc. There are free options out there for all of these things and more, and while they take a little more messing around with, I’m sure many of you will find the experience of tackling that challenge rewarding. You might even learn something in the process.
I hope you enjoyed the series, and I look forward to sharing the next project with you soon!