This tutorial is the second in my series on setting up a website using free infrastructure. In this section we’ll cover booting up and connecting to your EC2 instance, configuring security groups, and some basic command line tools for folks who have never used the command line before.
Part 1 | Part 3 | Part 4 | Part 5 | Epilogue
EC2 overview
EC2 stands for Elastic Cloud Compute, and is a service that provides “computers” over the internet. EC2 instances and their equivalents at Google and Azure are the backbone of the cloud revolution. Before cloud services, using web servers and infrastructure usually meant buying physical servers, or buying time from dedicated hosts. Now, we can rent computer time for pennies, configure it however we want from the comfort of a home or office, and wire it up to all the other crazy features AWS has to offer.
EC2 instances are powerful tools, made more so by something AWS provides called an Elastic Load Balancer. As traffic grows, an ELB will split it between duplicate instances to keep one from being overwhelmed. AWS will even let you script initialization of new instances so the service will maintain them as necessary. Pretty cool.
EC2 instances are run out of tremendously complex server farms scattered across the globe, but for the sake of what we’re doing it’s helpful to think about our instance as a single computer in a building somewhere. The computer never turns off, and has only the software we decide we want on it.
Our EC2 configuration will be fairly straightforward for this series; we aren’t going to be adding some of those more advanced features, which are a) overkill, and b) cost money, thereby defeating the purpose of a series on free websites. But know that most SaaS platforms on the web use some combination of EC2 and ELBs for the majority of their horsepower.
Setting up an EC2 instance
Launching an EC2 instance is very straightforward. After logging into AWS, check your region and navigate to the EC2 dashboard (you can search from the “Services” dropdown in the top menu bar). Select Instances from the left menu, and click the big blue Launch Instance button to start the EC2 launch wizard.
The first decision to make is which image to select. An image is essentially a set of software and configuration files which represents the computer it was taken from–a snapshot of a computer in time. You can use these snapshots to set up other machines to be exactly the same as the original.
There are a number of free-tier eligible machines available; we want the one called Ubuntu Server 18.04 LTS. On the Instance Type page, select the t2.micro, the only instance available for free, and press the Review and Launch button. Review your image and instance type, and press the Launch button to get started.
AWS will prompt you to select a key pair. We’re going to create a new key pair; name your pair and press the Download button to save the private key.
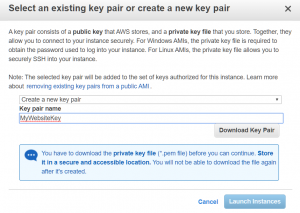
DO NOT LOSE YOUR PRIVATE KEY! Our private key file is essentially our password; we need it to log into our instance. Save it in a safe place; if you do lose it you’ll lose access to your website infrastructure and will need to build everything over again.
Your instance will spend a few minutes booting up and configuring itself. You can watch it from the EC2 dashboard. When it’s ready, you’ll be able to get its IP address, which will allow you to see it from anywhere on the internet.
Connecting to your EC2 instance
The next step is to connect to your new instance. I’ve always used PuTTY to do so, but with the recent Windows update that installs OpenSSH by default you can also connect via the command line. We’ll cover both in this section.
If you’ve already been through Part 1 and have downloaded the PuTTY client, go ahead and boot it up via the start menu.
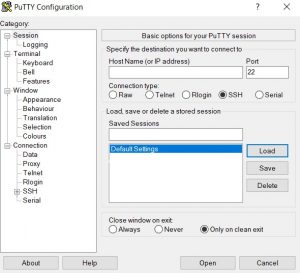
There are a LOT of options and features in PuTTY, but we don’t need the vast majority of them. All we need to do is provide a username, our EC2’s IP address, and our private key, and we’re good to go.
The username and IP address are easy. If you used the Ubuntu AMI, AWS defaults the username to “ubuntu”. You can find the IP address in the EC2 instance dashboard, under the IPv4 Public IP heading. Both of these go into the Host Name field using the following format:
username@IPaddress
Which will look something like:
ubuntu@4.52.32.101
Lastly, we need to add our private key. We do that by going to the Auth tab in the Category menu (under Connection/SSH). The default settings can be left the same, but when we press the Browse button to add our key and navigate to the folder we stored it in, we find we can’t actually use it. What gives?
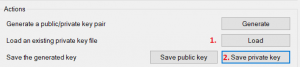
It turns out AWS provides keys using the .pem format, but PuTTY only accepts the .ppk format. Luckily, PuTTY provides a tool as part of the installation process called PuTTYGen that will translate for us. Open it up, press the Load button to find & convert your key, and then Save Private Key to save the new version. PuTTYGen will complain about a passphrase, which you can add or not as you prefer, and then save it.
Back in PuTTY, add the new .ppk key and head back to the Session tab. You can save your login credentials by filling out the Saved Sessions field and pressing the Save button, which will keep you from having to fill everything out every single time. Once saved, Open the session to begin connecting…
…except nothing happens. We can’t connect, and eventually the session will time out.
It turns out that AWS is providing an additional layer of security we need to edit. So log back into AWS, open up the EC2 service, and select Security Groups from the side menu.
AWS Security Groups
AWS security groups behave the same way as a firewall does: they allow you to manage the flow of traffic to services protected by them based on where the traffic is going to/coming from, and what port the traffic is trying to enter through. By default, inbound ports start off closed, which keeps all traffic out. We need to open a door.
Select the security group attached to your EC2 instance and select the Inbound tab. Press the edit button to open up the edit wizard.
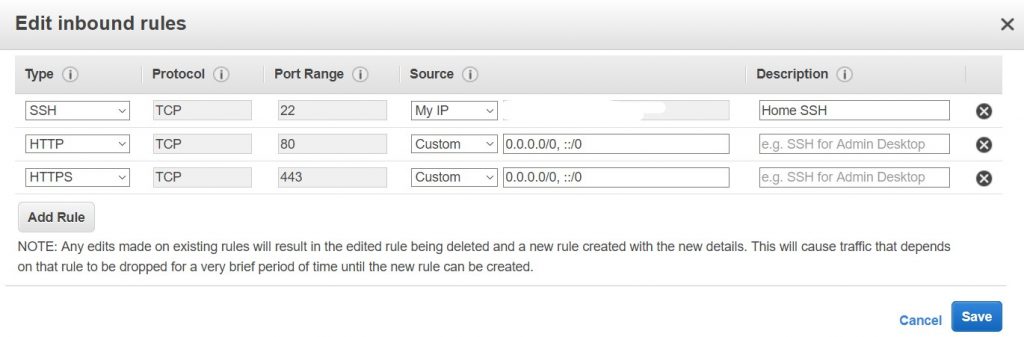
First, we need to make a hole for our SSH traffic to enter through. Delete the default rules and create a new rule of type SSH. The wizard will automatically fill out the port & protocol fields (22, TCP), leaving you to fill out your IP address. You can fill it out manually, but it’s much easier to select the “My IP” option from the source dropdown and let the wizard do it for you.
We have now opened a hole in the firewall we can connect through. Save the new rules and try to connect again. This time, it should work:
Let’s go ahead and add a few more rules while we’re in here. We’re going to need to allow web traffic from anywhere once we get our website running, so we need to add an HTTP and HTTPS rule that allows all traffic. If you’re someone who works from a few locations, you’ll also need to add additional SSH rules to include the IP addresses of your other networks. I wouldn’t recommend allowing SSH connections from anywhere as you leave your EC2 instance accessible to SSH attempts from anywhere in the world. If you’re the kind of person who lives on Starbucks & hotel wi-fi, look into getting a VPN service and allowing SSH from the VPN’s IP address instead.
Connecting via the command line
NOTE: Even if you’re not interested in using the CLI to connect to your instance and prefer to stick with PuTTY, if you are a complete newbie to shell commands it’s worth reading this section as we’ll cover a few basic shell commands you’ll need moving forward.
An alternate method for connecting to your instance uses the Command Line Interface (CLI) and OpenSSH, an open-source SSH tool that comes default with Linux, Mac, and even Windows 10 machines. If your computer doesn’t have OpenSSH, it’s worth getting–the utility also comes with secure copy (scp) and secure FTP (sFTP), which are both quite handy to have in a pinch.
To use OpenSSH, open up your preferred CLI interface. The default program on Macs is called Terminal; Windows have both Command Prompt and Powershell; I use PowerShell as it has a lot more support and a few nice features that make things a little more manageable when using it. You’ll be greeted with a line of text that looks something like this:
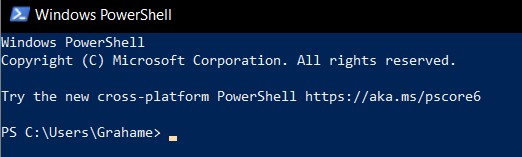
The line where you’re cursor is blinking shows the folder you’re currently in. C:\Users\Grahame can be navigated to via the File Explorer and we can see all the folders within the Grahame folder. We can also use the command line to see what files are in the Grahame folder. Type the following into the command line and press enter:
$ lsYou should see a list of all the files and folders in your current folder. Excellent! You can change folders using the cd command. For example, to change into the Videos folder, I type
$ cd Videos
and here we are. My cursor is now blinking next to C:\Users\Grahame\Videos and I can now run commands in the Videos folder.
You can jump directly to a specific folder by following cd with the path name of the folder you want to access. We need to find our private key, so use cd to travel through your folders until you reach the folder with your key. Once you reach the right folder, use ls again to confirm the key is there, and then check that OpenSSH is installed and running properly by using the ssh command:
$ sshIf OpenSSH is properly installed, you’ll be presented with a list of command flags: -b, -c, -D, etc. The command flags allow us to modify a command and pass it additional parameters and information. To use OpenSSH with a key file, we need to pass it the -i flag with the name of our private key (including the .pem). We’ll use the same host@IPADDRESS path for our connection, and we’ll let OpenSSH handle the rest as the defaults are good enough for us. So our command is:
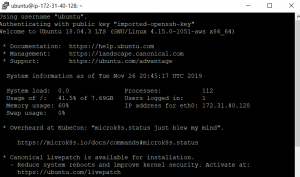
$ ssh ubuntu@IPADDRESS -i private_key.pemIf it works, you’ll connect to your EC2 instance (you may have to accept a warning about your certificate identity), and we’ll be good to go.
I’m in! Now what?
We now have a running EC2 instance we can securely connect to. We can run shell commands within the instance the same way we can on our local machine. And we can control the AWS security groups to change the flow of traffic to and from our instance.
In Part 3, we will configure our EC2 instance to serve as our web host, and configure our DNS so that we can use a domain name instead of an IP address to reach our website.