This article was previously titled “Part 4: MySQL, Amazon RDS, and PHP.” We set up a second instance for a database to power our site, which is likely overkill. I recommend you read the Epilogue before proceeding—most readers will find it more prudent to follow the instructions laid out over there.
AWS can be used for so many things. A person could spend a lifetime playing with all the different tools they make available to you in the cloud. But you ain’t got time for that, so read on for part four of my series on setting up a website using only free infrastructure. We’ll be getting a database set up to power the Wordpress CMS with, the final piece of groundwork necessary to launch our site.
Part 1 | Part 2 | Part 3 | Part 5 | Epilogue
Last time, we installed NGINX, configured the DNS to use our domain name, and got a primer in how NGNIX manages websites and serves pages to visitors. We also got familiar with the command line, and computing without help from the windows and folders we’re so familiar with. Doing so takes care of the ‘L’ and ‘E’ in ‘LEMP’, which means the ‘M’ is up next: MySQL on Amazon RDS.
Why do we need a database? (CMS Overview)
We discovered last time that we can directly edit and update web pages within NGINX, and serve them to our visitors, no database necessary. While editing things in nano/vim isn’t exactly a quick process, it’s not at all unreasonable to think we could manually code our web pages locally, and use an FTP client like FileZilla or even good old secure copy to get them up to our web server. We could even install things like NodeJS or PHP to give our site cool modern functionality and never go anywhere near a database.
So what gives? Why set up a database?
The answer, in a nutshell, is WordPress. WordPress is a content management system, or CMS, and is by far the most popular one on the internet. True to their name, content management systems manage content: files, photos, web pages, videos, music, etc. Designing, launching, and maintaining a website is a LOT easier when using a good CMS, to the point where there are literally thousands of tutorials on how to build a WordPress site out there. WordPress has the added advantage of being highly customizable thanks to a wide universe of 3rd-party plugins, most of which are free.
Since WordPress will be managing our content, it needs somewhere to store it. Individual files (pictures, movies) can be stored on the server in the file structure, but posts and pages are a little tricker. WordPress uses PHP, and serves web pages based on matching rules in template files with the relevant information for that post or page. The template files get stored on the server, but the information goes in the database so it can be queried and delivered as fast as humanly possible.
This is not a primer on database administration, or even how databases work. And to be honest, it’s completely irrelevant to what we’re trying to do here. AWS’s Relational Database Service (RDS) lets you set up all the config without writing a single line of SQL, and WordPress will configure the database for us. We just need to get everything wired up.
Setting Up AWS RDS
Setting up a free RDS instance is actually one of the easiest things we’re doing in this series. Navigate to the RDS service and press the big Create Database button on the dashboard to get started.
Choose Standard Create, MySQL, and Free Tier in the first three sections. The default version of MySQL is fine for our purposes (at the time of this writing it was 5.7.22). We will need to configure the database credentials in the settings menu, and double check our connectivity settings to make sure our EC2 instance can see our database.
Fill out the settings with a database name, and a username for the database administrator. I used “wpdatabase” and “dbadmin” for mine, but it can be anything you can remember. Fill and confirm a secure password; MAKE SURE YOU WRITE IT DOWN. You’ll only need to type it in once, so it’s fine if its hypercomplicated.
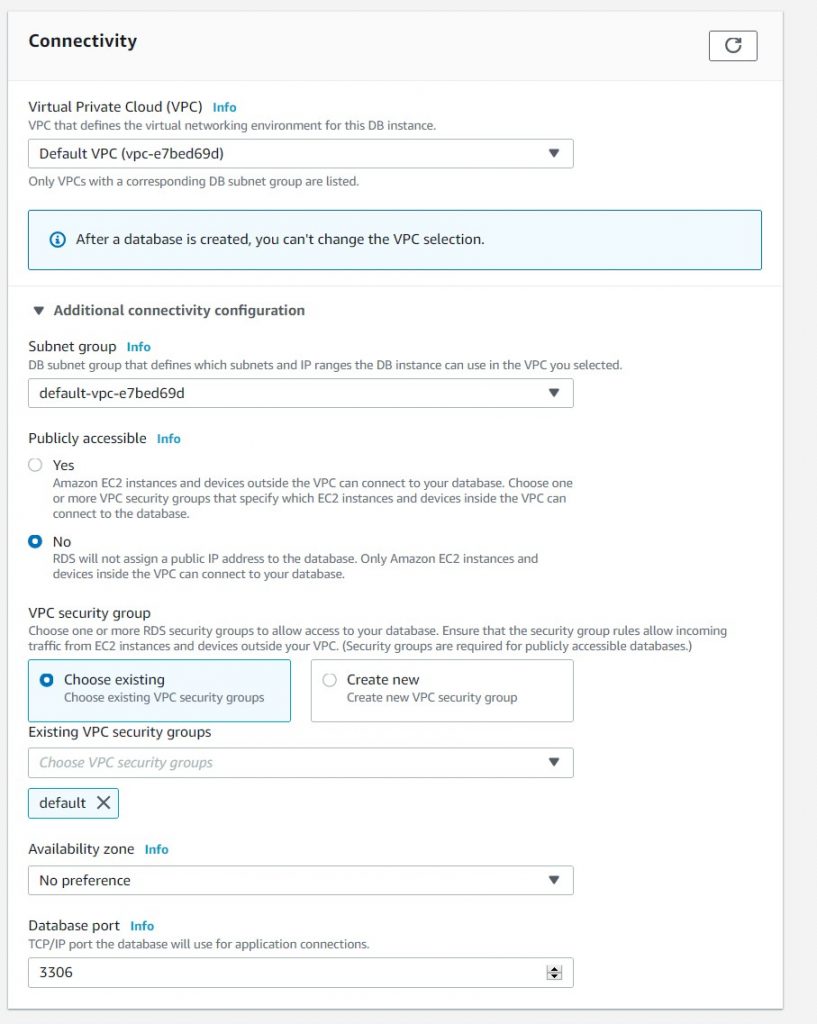
Under config, review the default settings. If this is your first time with AWS, you should only have the default VPC available. If you’ve set up other VPCs in past projects, make sure you’re launching your database in the same VPC as your EC2 instance. Also make sure that it has the same security groups assigned as your EC2 instance.
A virtual private cloud (VPC), is best thought of as a room in a house. Everyone in the room can see and speak with one another, but they cannot see and speak with folks in other rooms without opening windows and doors. In this analogy, our various instances will be able to see and speak with one another since they are part of the same VPC, but if we launched another EC2 instance in a different VPC, we would not be able to connect the instances without some extra networking work. The analogy breaks down somewhat when you start hosting VPCs within VPCs, but hopefully the main concept is clear. You gotta share a cloud with someone to talk to it.
I also give my database access to the same security groups as my EC2 instance so I don’t have issues later because I forgot to poke holes in my security group. I think this is technically not best practice, but in reality if an attacker got this far we’re completely pwned anyway, so it doesn’t matter too much.
You can set some additional configuration preferences as suit you. I turned on error log and general log, left auto backup and auto minor version upgrade enabled, and turned on deletion protection.
Also buried in the additional configuration preferences is the Initial database name field. You must set this! We can in theory do this later, but it’s easier to do it now
Once you’re all set, launch the database instance to finish up.
AWS will begin spinning up your shiny new database instance. Once the instance is running, it will automagically create an empty database we can connect to. It doesn’t take AWS too long to set up, so while it does that, let’s poke some more holes in our security group so that AWS isn’t blocking the database and Wordpress from talking to each other.
Go back to the EC2 instance dashboard, and edit the security group assigned to your instance. We need to add an inbound rule for port 3306 (the MySQL port):
- Type: MySQL/Aurora
- Port: 3306
- Source: The security group.
It’s a little weird, but essentially your database sends traffic out into the VPC, and it is filtered by the security group before it reaches the EC2 instance. So we need to allow the traffic back in; hence our new rule.
Installing MySQL
We’re going to run WordPress in our EC2 instance, so SSH back into your web server. Since we set up our database to run MySQL, we’ll need to install the appropriate software on our web server so we can issue the database commands. It’s one line:
$ sudo apt install mysql-serverMySQL installed! On to the next thing!
Well, not really. The installation is up and active, but there are some security issues we should spend a moment fixing. Run the included security script:
$ sudo mysql_secure_installationRespond yes (y) to everything until presented with the password policy validation menu:
There are three levels of password validation policy:

LOW Length >= 8
MEDIUM Length >= 8, numeric, mixed case, and special characters
STRONG Length >= 8, numeric, mixed case, special characters and dictionary file

Please enter 0 = LOW, 1 = MEDIUM and 2 = STRONG:
If you entered a strong password earlier, you should be able to enter 2. Otherwise, select whatever tier is appropriate. The script will ask you to set the password; go ahead and retype your database password. Continue spamming y until the script completes.
Installing PHP & Configuring NGNIX
One of the upsides of NGINX is the fact it comes completely stripped out, keeping it lightweight and free of bloat. In this case, it’s also a minor downside–NGINX cannot understand PHP programs since it lacks a PHP processor. However, it’s a simple enough install to get the necessary package, php-fpm. While we’re at it, let’s go ahead and add the PHP MySQL extension, php-mysql. We’ll need it later.
$ sudo apt install php-fpm php-mysqlAnd everything is installed! However, we still need to tell NGINX that it now has the ability to process PHP. So we’re headed back to our handy-dandy config file:
$ sudo nano /etc/nginx/sites-available/mywebsite.comWe need to make the following changes:
- Uncomment the PHP sections, specifically the
location ~ \.php$andlocation ~ /\.htsections - Delete
listen [::]:80 default_server; - Change the
server_nametomywebsite.com - Change the version of
fastcgi_passfrom.../php7.0-fpm.sockto7.2 - Add
index.phpto the list of indices
Our new configuration should look like this:
server {
        listen 80 default_server;
        root /var/www/mywebsite.com;

        index index.html index.htm index.nginx-debian.html;

        server_name mywebsite.com;

        location / {
                # First attempt to serve request as file, then
                # as directory, then fall back to displaying a 404.
                try_files $uri $uri/ =404;
        }

        location ~ \.php$ {
                include snippets/fastcgi-php.conf;
                fastcgi_pass unix:/var/run/php/php7.2-fpm.sock;
        }

        location ~ /\.ht {
                deny all;
        }

 	access_log /var/www/mywebsite.com/logs/access.log;
        error_log /var/www/mywebsite.com/logs/error.log;
}
Test for typos with sudo nginx -t, save, and reload nginx with sudo service nginx reload.
We can test that PHP was successfully stalled by creating a quick info page. Create a new file in your /var/www/mywebsite.com folder called test.php and put the following in it:
<?php
phpinfo();
Save the file and then navigate in your browser to mywebsite.com/test.php. If all is well, you should be greeted with the following info page:

That’s it! The LEMP has been launched! An open source miracle has occurred!
Well, sort of. But our infrastructure is now fully configured and ready for us to set up WordPress. In Part 5 we’ll investigate just how to set up WordPress so it can use our networked RDS instance and our EC2 LEMP server, take care of security issues & install SSL certificates, and set up a private CDN using AWS s3 and CloudFront.