It feels like just a few weeks ago that I launched a free website, and shared the process with the world. But then I woke up to a bill from AWS, an unhappy reminder that time keeps on slipping, slipping, slipping…

Unfortunately, “Free Tier” is a bit of a misnomer, or at least a “subject to terms and conditions” kind of thing. Free web hosting was never gonna last forever, and so now it comes time to settle our accounts. If you’ve not got a free website up and running, check out the whole series first:
Part 1 | Part 2 | Part 3 | Part 4 | Part 5
Otherwise, let’s do what we need to do now that money is once again part of the equation. We’re back with the (second) final part of How to Build a Free Website.
The Bill
I’ll be the first to admit, I was not expecting the price tag on my first full month out of Free Tier services:

$26 bucks? For a website I can set up at Bluehost or Hostgator for $10? And I don’t have to spend time updating things?
Well, this is a ripoff.
Still in shock, I was about four clicks away from exporting the site, nuking the AWS account, and moving everything over to one of the zillions of web hosts out there. I’d bought the domain from Google; they have a deal with Bluehost to automate setup AND you get a super easy email setup as well.
But then I stopped, and took a deep breath. I was missing something here.
Web hosting businesses all run off the same model (plus or minus): get a lot of cheap, stable servers (either by building their own farm or by paying for space on AWS, Azure, etc.), and rent them out. While they do get some advantages through volume discounts, complex shared configurations, and so on, the core of their model is entirely based around how much it costs to run a computer per hour. Even as an individual user, the idea that I was somehow spending 2-3x the money for the same computer time made ZERO sense—optimizations for a technology that’s only changed so much in the last two decades could only be so good. Plus, cloud businesses have minuscule margins on basic computing systems because the competition is so fierce. Commoditized markets with zero delivery costs should mean commoditized pricing, even at the smallest scales.
So I looked at the line items, and found the culprits:
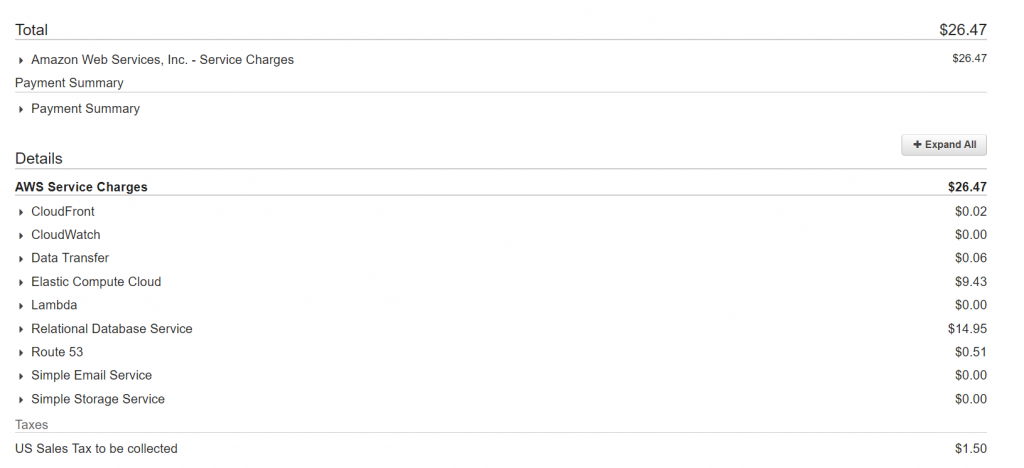
I’m getting slammed by RDS (database) costs. My EC2 costs are higher than I’d like, as they’re break even with web hosting services for the same product and zero of the services. But there’s no point in addressing the EC2 item if we can’t do something about RDS.
To RDS, or not to RDS?
An RDS instance under the hood is actually just a specialized EC2 instance a customer pays a bit more for to get certain features that are nice to have when you know you’ll be running a database. Both my EC2 instance and my RDS instance use t2.micro boxes, but I paid an extra $0.006/hour for my RDS instance, plus an additional $2.30 for some additional storage costs (presumably for backups and database snapshots).
The extra features are great if you’re running a SaaS app in the cloud, storing business data, or doing other things where you need to keep your database on a different machine, ensure you’ve got that extra layer of protection, and so forth. If you’re trying to run a simple WordPress website with two dozen pages and maybe 100 visitors a month, using RDS for your database is overkill in the extreme.
There’s a second point here that the additional costs of RDS also masks. AWS does pricing on “compute hours,” which is calculated as:
# of instances × # hours running
What this means is that if you run two instances, you pay double what you would pay for a single instance. Obvious in hindsight, but surprisingly easy to overlook if you’re not paying attention.
Clearly then, the move is to ditch RDS altogether, in favor of bringing everything into one single EC2 instance. I don’t expect my traffic or content to balloon over the next twelve months, so I see no reason to increase the size or power of my existing EC2 instance. I’m simply going to export my database out of RDS, install MySQL in my EC2 instance, and reimport my database. After wiring WordPress up to the new, local database, I’ll delete my RDS instance and save myself some cash.
Relocating Databases
Wouldn’t it be great if we could somehow just copy-paste a database from one place to another? Ctrl+C, Ctrl+V, and move on with our life?
Actually, we can, or at least come close. All databases have an “export” function, which will give us a file we can then import into our new database. It’s a few simple commands and then we’re all set. If you’ve been following the series thus far, you’ll have everything you need to get started.
First we need to get into our RDS instance. You can set up an SSH tunnel straight to the box (remember, an RDS instance is just an EC2 instance with some bells and whistles), but if you set it up properly you’ll first have to reconfigure the security groups and then create a new tunnel from scratch. It would be great if we could get into another computer that’s part of the security group, then go from there to the RDS instance.
Exporting our current database
Turns out, we’ve got something like that! SSH into your EC2 instance (which we know is in the group since it talks to the database). If you don’t have it written down, you’ll need to get all your database connection info from your wp-config.php file. You’ll also need to install MySQL on your EC2 instance if it’s not already there. It’s a straightforward process; just run the following three commands:
$ sudo apt update
$ sudo apt install mysql-server
$ sudo mysql_secure_installation
You’ll be prompted with a whole bunch of security questions. Create a password for the root user, and accept the defaults for everything else. Once you’re done, check the status of the MySQL service with the command service mysql status.
Once MySQL is installed, we can connect to our remote RDS instance with a single command:
$ mysql -u wordpress -h wpdatabase.cabthgz5oiyo.us-east-1.rds.amazonaws.com -P 3306 -D wpdatabase
It should look pretty familiar, but let’s break it down anyway:
mysql: the program we want to run-h: the "host" parameter. This is the location of the computer running our database.-D: the "database" parameter. We want to connect to a database on our host with the namewpdatabase-u: the "user" parameter. We want to have the user permissions of the userwordpress-P: the "port" parameter. By default, MySQL listens for connections on port 3306.
Give it a whirl and make sure you can connect (you’ll be prompted for the database password). Once you know it’s working, quit using the MySQL command \q (pressing Ctrl+C should also work). You’ll end up back in your EC2 instance.
To actually export our database, we’ll use a utility included with our MySQL installation called mysqldump, which uses the same syntax as MySQL does:
$ mysqldump -u wordpress -h wpdatabase.cabthgz5oiyo.us-east-1.rds.amazonaws.com -P 3306 -D wpdatabase > db-export.sqlThe only changes here are the program name (now mysqldump) and a tailing command, denoted by the > character. The names and syntax might feel a little intuitive, particularly if you think of the > not as a “greater than” symbol but as an arrow pointing right. We are telling mysqldump to output the results of the command to a file called db-export.sql. You can name your file whatever you like, but make sure it has the .sql file extension for clarity and to avoid issues further down the line.
Run the command. It’ll take a few seconds or even a minute or two; any longer and either something is wrong or your site is way too popular for this tutorial. Once complete, we can ls in our current folder to check the export file is where we want it to be.
Rebuilding our database
First, we need to set up our local MySQL install to receive our new database. We need to recreate the wordpress user, and take care of some general admin stuff. For a more detailed explanation of how to do this, check out Step Three of this excellent Digital Ocean article. For the quick and dirty version, simply run the following commands:
// start MySQL
$ sudo mysql

// update the root user to use a password (optional)
mysql> ALTER USER 'root'@'localhost' IDENTIFIED WITH mysql_native_password BY '[PASSWORD_FROM_INSTALL]';
mysql> FLUSH PRIVILEGES;

// create wordpress user
mysql> CREATE USER 'wordpress'@'localhost' IDENTIFIED BY 'PASSWORD';
mysql> GRANT ALL PRIVILEGES ON *.* TO 'wordpress'@'localhost' WITH GRANT OPTION;
You’ll notice that the commands once connected to MySQL take a different form. MySQL uses the SQL query language to perform all its operations, and has a small admin/operational database running in the background to make the program work. We use SQL to change the tables so that the app behaves as we want it to.
As it turns out, databases are also created using SQL commands. So to create a new database, we use the following SQL command:
mysql> CREATE DATABASE wpdatabase;And thanks to mysqldump, we have a file full of SQL commands that will rebuild our database for us! We just need to tell MySQL to run it. Exit MySQL, confirm you’re in the folder with our db-export file, and run the import with:
$ mysql -u wordpress -p wpdatabase < db-export.sqlBoom. Done.
All that remains is cleanup. Edit your wp-config.php file with the new database info, changing the 'DB_HOST' line to use 'localhost' instead of the RDS URL. Save, and go check out your website. It should be still up and running; in fact it should look exactly the same as it did before. When you’re comfortable, stop your AWS RDS instance, and then delete it altogether (apparently AWS will automatically restart any database left off for seven days).
Final Thoughts
The other big pricing number was the cost of the EC2 instance itself. AWS has one option to allow you to reduce your costs there as well: pay up front. You can purchase a Reserved Instance credit for your EC2 instance, which lowers the cost by about 1/3. They’ve got a few different options, including pay upfront in full, pay partial upfront, 1-year, and 3-year terms. Not all options are available in all areas; I went with the 1-year/full upfront option as I intend to keep this site running for a long time still. By giving up scaling flexibility, which isn’t really something I need, I can get rates less than what I would get at Bluehost or Hostgator.
The net final monthly bill? If you average out my EC2 costs on a month-to-month basis, I am now paying $6.58/month for my website. I save a whopping $36/year over using a hosting company, and I get the fun of messing around with AWS.
I do lose out on the support and maintenance however, so if you feel like you need or want those services it is worth migrating out of AWS entirely once your term is up. If you do choose to migrate out entirely, the process is much the same; you can also use one of the myriad of WordPress plugins to export the site and reimport it at your new location.
Whatever you decide, I hope you’ve enjoyed the process of building a website from scratch, and I look forward to hearing about your further adventures in website design!