Welcome back. This tutorial is the third in my series on setting up a website using free infrastructure. We’ll be installing NGINX (pronounced “engine-X”) to use as a web server and setting up our DNS to use our domain name.
Part 1 | Part 2 | Part 4 | Part 5 | Epilogue
In the previous section, we set up an EC2 instance to run our website. Using the physical hardware analogy from earlier in the series, we have bought a computer, connected it to our firewall, and poked holes in the firewall so we can connect to it from the internet. Now, we need to install some software to actually make the website work.
NGINX Overview
What is NGINX? Well according to the folks who wrote the thing:
NGINX is a free, open-source, high-performance HTTP server and reverse proxy, as well as an IMAP/POP3 proxy server.
Errr…cool? What does that actually mean? Let’s break it down as best we can:
HTTP Server
At its most basic, a server is a piece of software that you ask for things and it delivers them to you. Just as you ask a server in a restaurant for items off the menu and receive a dinner, same thing happens with a server. You send the server a request, e.g. “Give me the web page at grahamewatt.com” and it delivers the code necessary for your browser to render that web page. Also like in a restaurant, you may not actually like what you get served, but you’re getting what you asked for no matter how good the meal is or nice the web page is. If you want something different, you need to ask for something else. We need a web server so that when people ask for the web pages located on our domain, we can serve them something tasty.
HTTP just happens to be the protocol used to ask for things across the internet; HTTP will also cover HTTPS, which NGINX supports. You can read more about it in Part 2
Reverse Proxy
A proxy in networking is the same as in real life—it’s a computer acting on behalf of another computer. Most people use proxies without realizing it whenever they’re on a wi-fi network—all of your page requests go via your router which actually sends them out into the wider world on your behalf, receives the response and then delivers it to you. Your router is a forward proxy and is behaving as your agent to the web. The critical advantage of a proxy in your home network is that it can manage the traffic of everyone on the network. You get the blog you wanted to read and your anime-loving roommate gets episode #1,259,352 of Naruto, and neither of you have to worry about accidentally receiving each other’s material.
A reverse proxy is a backwards forward proxy. Instead of making requests on behalf of a user, a reverse proxy receives requests on behalf of a group of servers, correctly sorts the traffic, and returns the response back to the user. What this means is that you can have multiple servers hosting your website, but your user never has to worry about which one is actually filling the request—they always get the cat photo they were looking for.
We’re not going to have multiple web servers, so we don’t have to worry about complex proxy networks. We’ll just use NGNIX to convert incoming traffic to HTTPS and leave it at that.
IMAP/POP3 proxy server
Email. We’re not setting that up, so we can ignore this.
Installing NGINX
Before installing NGINX, we need to get our bearings. SSH into your EC2 Instance (Part 2) if you’re not already logged in. In addition to all the text giving you details about Ubuntu and your instance’s status, you’ll see the entry field has changed to something like this:
ubuntu@ip-172-31-84-81: $This is how Linux does things, but it’s essentially the same idea as your Windows or Mac CLI. You’re in a folder in the computer’s file structure, and can navigate using the cd command. Linux also helpfully tells us our username (ubuntu) and internal host (ip-172-31-84-81, less useful). The ubuntu user is one of several default users and the one AWS makes you log in with by default.
The first thing we want to do is switch to the root user, which will give us full access to all parts of the system and let us run the commands we need to. Type:
$ sudo su root- sudo: “Super user do.” Until we have root access, we are limited to doing things on our instance based on the permissions our current user has.
sudoallows us to run commands as though we had full admin privileges, which is exactly what we need to change to the root user. - su: “Switch user.” We follow it with the name of the user we wish to change to, hence
su root.
Now we have root access, let’s make sure we have all the latest updates. Type:
$ apt-get updateapt-get is a package manager and installation utility which comes default with Ubuntu installs. It’s quite powerful, allowing us to install, update, upgrade, configure, and uninstall any software registered with the manager.We’ll use it next to install NGINX:
$ apt-get install nginxYou’ll be asked to confirm, and then NGINX will be installed. It won’t be running by default, so start the service:
// EITHER
$ service nginx start

//OR
$ /etc/init.d/nginx start
And we’re up! We can check to see if it’s working properly. Enter the public IP address of your EC2 instance into your web browser. If NGINX is running properly and you correctly configured your security groups, you’ll be greeted with the following web page:
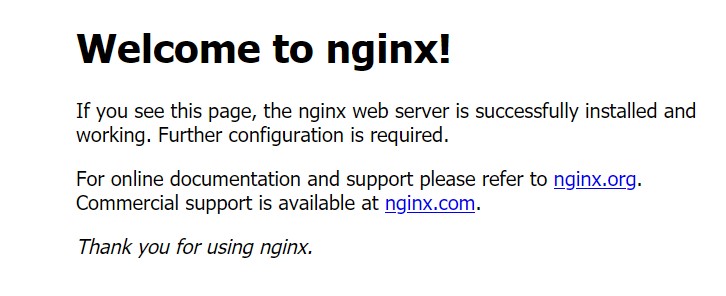
We now have a running web server! The default page is being loaded from /var/www/html/index.nginx-debian.html. We can use nano, a file editor program, to edit it. /var/www is the default location for websites in NGINX. Change to the /var/www/html directory using cdor type the full address when using the nano command:
$ nano /var/www/html/index.nginx-debian.htmlIf you press the **tab** key after typing the first few letters of a file or folder, ubuntu will auto-complete the file name. Much faster than typing "index.nginx-debian.html"
We can edit the HTML of the home page using the nano editor. Change one of the text lines, and close the editor (ctrl+x). Make sure you save it as index.nginx-debian.html. Reload your website to see your changes.
Managing the DNS
Let’s take a quick minute to set up our web domain so we don’t need to use our IP address to find our website. Exact instructions will vary depending on where you purchased your domain and how the registrar/DNS host is set up; however they will all allow you to accomplish the same thing by adding DNS Records.
The Domain Name Service (DNS) is, to use a classic analogy, the phone book of the internet. Just as folks used to use the Yellow Pages to look up phone numbers, internet users use DNS to look up the IP address of a website by searching for its name and then dialing the IP associated with the web domain. Right now, we have an entry in the phone book, but it’s just our name—there’s no phone number IP address associated with it.
To point our domain to an IP address, we need to add an A Record. If you’re using AWS’ Route 53, this can be done by pressing the “Create Record Set” button. Set the name to @ (or leave it blank, if allowed) and the value to your IP address, and save the record. It’s also good practice to add a record to handle the www. subdomain. Either add another A record pointing to your IP address with name as www, or add a CNAME Record pointing www to your root domain (mywebsite.com).
Save the changes and give them a few minutes to propagate. Then test your domain changes by opening up a new browser window and going to your website. If it works, we’ll be back at the NGINX server page and we can move on to getting NGINX all set up.
Configuring NGINX
We’ve installed NGINX but we still need to get it configured for the website we want to build. First, we want to create a folder for our new website so we can keep everything together. cd into /var/www if you haven’t already, and create a new folder using the “make directory” command:
$ mkdir mywebsite.comWe’re naming the website after our domain name for clarity’s sake; you can name it whatever you want. cd into your new folder and create a new test home page using nano:
$ nano index.htmlNano will create a temporary file called index.html which we can now edit. Write a quick test page and save it using the editor. You can also copy-paste the one below; to paste from the clipboard use ctrl+shift+v.
<html>
  <head>
    <title>Welcome to mywebsite.com!</title>
  </head>
  <body>
    <center><h1>mywebsite.com is working!</h1></center>
  </body>
</html>
Save it as index.html and close nano. The next step is to tell NGINX about our new website.
The Config File
cd to /etc/nginx/sites-available, and check out the default configuration file using nano default.
Make friends with the config file. This is where pretty much all of our efforts involving NGINX will center around. We won’t edit the default config file—it’s good to have as a reference. So close nano and let’s duplicate the default file using the copy command:
# replace mywebsite.com with your domain
$ cp default mywebsite.com
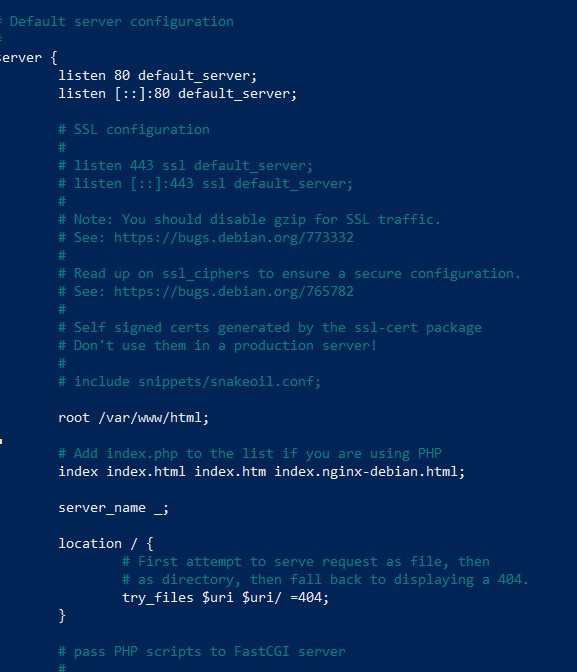
Open up our new config file and delete out the commented lines (start with a #) above and below the main server{...} block. You should end up with something like this:
server {
        listen 80 default_server;
        listen [::]:80 default_server;

        root /var/www/html;

        # Add index.php to the list if you are using PHP
        index index.html index.htm index.nginx-debian.html;

        server_name _;

        location / {
                # First attempt to serve request as file, then
                # as directory, then fall back to displaying a 404.
                try_files $uri $uri/ =404;
        }
}
Leave the section about PHP alone if it's included in your default config file. We'll need it later and we don't want to type it all out.
Whenever NGINX receives a request from a user, it checks the configuration files associated with the request and uses the instructions within the config file to serve the page. NGINX can run several virtual servers at once, each with instructions defined in a server {...} block. Within each server block are the configuration instructions for that server. To make our site work, we need to have the following commands defined:
- listen: Tells NGINX what port to listen on. 80 is the default for HTTP, which matches our security group rules. The
default_serverparameter is an optional rule that tells NGINX what to serve if it can’t figure out how to deal with conflicting information. - server_name: The domain (or IP address) of our site. Any requests coming through the listening port that match the domain of the
server_namewill continue to be processed within this block. You can have severalserver_nameentries in case you want multiple domains or subdomains to behave the same way; e.g.server_name mydomain.com www.mydomain.com;will cause requests that omit the “www” to behave the same way as those that remember to add it. - root: The root folder of our website. We created our website folder earlier at
/var/www/mywebsite.com. - index: The home page of the website. We created ours earlier at
index.html. You can also addindex.phpin anticipation of installing Wordpress, which uses PHP to deliver web pages. - location:
locationtells NGINX what to do for specific requests within our website. Thankfully, we don’t have to definelocationrules for every web page we have. Instead, we can uselocation / {...}to define a generic behavior for all traffic that ends up at our root folder. - try_files: The try_files command tells a request that makes it into the location block to go to the designated locations. We can leave the defaults as is; our current command checks the request path and if it doesn’t exist delivers a 404: Page Not Founderror to the client.
It’s also a good idea to log site access and errors using the access_log and error_log commands:
server {
    ...
    access_log /var/www/mywebsite.com/logs/access.log;
    error_log /var/www/mywebsite.com/logs/error.log;
    ...
}
NGINX will automatically create a folder in your site folder and update log files as activity occurs on your site.
Fully configured, our config file should look more or less like the following:
server {
    server_name mywebsite.com;
    listen 80 default_server;
    root /var/www/mywebsite.com;
    index index.html index.htm index.php;

    location / {
          # First attempt to serve request as file, then
          # as directory, then fall back to displaying a 404.
          try_files $uri $uri/ =404;
     }

    access_log /var/www/mywebsite.com/logs/access.log;
    error_log /var/www/mywebsite.com/logs/error.log;

}
Save it and restart NGINX ( service nginx restart ). If a restart fails, you have typos or errors in your config file. If it succeeds, we’re good to go. All we need to do now is tell NGINX about our website. NGINX only knows about server rules in the /etc/nginx/sites-enabled folder, so let’s create a symbolic link from sites-enabled to our configuration file:
$ ln -s /etc/nginx/sites-available/mywebsite.com /etc/nginx/sites-enabled/mywebsite.com
Why didn't we create the configuration file insites-enabledinstead of linkingsites-enabledtosites-available? Mostly convention; when NGINX is managing multiple sites and applications it helps to be able to disable them without deleting their configuration. If you link fromsites-enabled, you can turn off a site or app by simply deleting the link instead of removing the whole site.
Restart NGINX and head to your domain. If you did everything properly, you’ll be greeted by your new website:
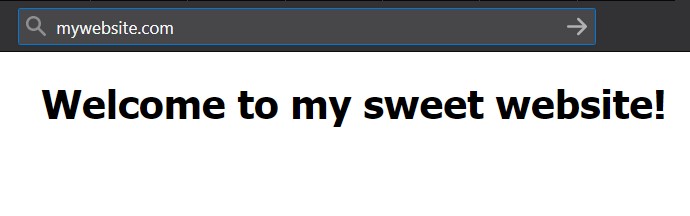
We’ve a long way to go still, but this is certainly a milestone to celebrate! We have now set up the L and the E of our LEMP stack. In Part 4, we’ll switch gears and focus on setting up a MySQL database (M) so we can install Wordpress (P). We’ll also set up our SSL certificates and edit NGINX so that all traffic is redirected to HTTPS.